Thursday, December 1, 2011

Spicy Sausage Dip

IMG_0031

I have one word for this dip: addictive. Like, unbelievably, crazy, super addicting. I can't keep my hands off the stuff! Its a perfect creamy dip made with zesty sausage and then tomatoes with green chilies for a perfect little kick! The original recipe calls for a dash or so of hot sauce to taste but I thought that might be a little overkill for me so I skipped it. But please add it in if you feel like you can handle the heat! For my sausage, I did end up using ground sweet Italian sausage instead of a zesty or spicy sausage because that's what I had on hand but I think a spicy sausage would also really kick this dip up a notch! I brought this to a party a few weeks ago and I think we went through three rolls of Ritz crackers and we were scrapping the bottom of the bowl. This is definitely a keeper!

Spicy Sausage Dip
Ingredients:
1 (16 oz.) package of ground sweet Italian sausage or spicy/zesty sausage
1 (15 oz.) can diced tomatoes with green chiles, undrained
2 (8 oz.) packages cream cheese

Directions:
In a large skillet over medium-high heat, cook the crumbled sausage until browned. Drain off any excess fat. Reduce the heat to medium and mix in the tomatoes and cream cheese. Continue to cook, stirring frequently, until the mixture is warmed through and the ingredients are well blended. Serve warm.

Source: Recipe adapted from Annie's Eats

Sunday, November 27, 2011

"Dreamy" Apple Pie

IMG_0044

I hope everyone had a great Thanksgiving! I know I have a lot to be thankful for in my life and I am so happy that I got to spend the day with my wonderful family and amazing boyfriend. We had a delicious spread as well, with way too much food of course. But I guess that's Thanksgiving for you! One of my favorite parts of Thanksgiving is naturally dessert. I always ask everyone what their favorite dessert is for Thanksgiving and this year my sister wanted pumpkin pie and my dad wanted apple pie and my boyfriend (who isn't a big pie person) wanted dirt cake. So I made all three!

IMG_0043

First up is this apple pie and it really does live up to its "dreamy" name. I used my perfect pie crust recipe which you can find here and is made with the most amazing apple pie filling I have ever tasted. Believe me, its hard to resist just eating the filling straight out of the bowl when you're making the pie. And then instead of a traditional pie crust on top, it is topped with a streusel topping. It really gives it an awesome cinnamon flavor and it all comes together with the creamy filling. So unbelievably yummy! And as you can probably tell by the picture, this pie was instantly devoured. It was more than half gone before I even got my picture! I guess that just goes to show you how great this pie is!

Dreamy Apple Pie
Ingredients:
1 whole Unbaked Pie Crust

For The Filling:
3 whole Large (4 Or 5 Small) Granny Smith Apples, Peeled, Cored, And Sliced Thin
1/2 cup Brown Sugar
1/2 cup Sugar
1 Tablespoon All-purpose Flour
1 cup Heavy Cream
2 teaspoons Vanilla Extract
1/8 teaspoon Cinnamon

For The Topping:
7 Tablespoons Butter
3/4 cups All-purpose Flour
1/2 cup Brown Sugar
1/4 cup Pecans (optional)
Dash Of Salt

Directions:
Preheat oven to 375 degrees. Roll out pie dough and place it in a pie pan. Decorate the edges as desired.

Add apple slices to a large bowl. In a separate bowl, mix together cream, sugars, flour, vanilla, and cinnamon. Pour over apples and pour apples into pie shell.

In the bowl of a food processor (or you can mix by hand) combine butter, flour, sugar, pecans (only if using, chop if you're not using a food processor), and salt. Mix until everything comes together in clumps. Pour topping over apples.

Attach foil to the edges and lay a piece of flat foil loosely over the top of the pie. Place pie pan on top of a rimmed cookie sheet and bake for one hour. At the end, remove foil and allow to finish baking and browning. Can bake for up to 15 or 20 minutes more if necessary. Remove from oven when pie is bubbly and golden brown.

Source: Recipe from The Pioneer Woman Cooks

Wednesday, November 23, 2011

Perfect Pie Crust

IMG_0035

I can't believe that Thanksgiving is tomorrow already! Is anybody else feeling the stress of preparing that huge Turkey Day feast? I sure am, but it definitely helps to pace yourself out throughout the week so you're not doing everything on one day. You'll be asleep before you even get to eat! But it also helps to have some great recipes that make the process just that much easier. We are big pie people in my house so it goes without saying that I have to make pies for Thanksgiving dessert. My dad wanted apple and my sister wanted pumpkin so I made one of each, figuring I get the best of both worlds then with two of my favorites! Its necessary when making pies to have that amazing, buttery, flakey crust. The crust really does complete the entire pie, its probably my favorite part! So here is my favorite pie crust recipe, a great staple to have around for any kind of pie. This recipe is from The Pioneer Woman and it really is a "perfect" pie crust! Check out Ree's post here for a great step-by-step tutorial on how to make this pie crust. And then get to baking on those holiday pies, only one day left until the big day!

Perfect Pie Crust
Ingredients:
1-1/2 cup Crisco (vegetable Shortening)
3 cups All-purpose Flour
1 whole Egg
5 Tablespoons Cold Water
1 Tablespoon White Vinegar
1 teaspoon Salt

Directions:
In a large bowl, with a pastry cutter, gradually work the Crisco into the flour for about 3 or 4 minutes until it resembles a coarse meal. In a small bowl, beat an egg with a fork and then pour it into the flour/shortening mixture. Add 5 tablespoons of cold water, 1 tablespoon of white vinegar and 1 teaspoon of salt. Stir together gently until all of the ingredients are incorporated.

Separate the dough into two equal parts. Form 2 evenly sized balls of dough and place each dough into a large Ziploc bag. Using a rolling pin, slightly flatten each ball of dough (about ½ inch thick) to make rolling easier later. Seal the bags and place them in the freezer until you need them. (If you will be using it immediately it’s still a good idea to put in the freezer for about 15 to 20 minutes to chill.)

When you are ready to use the dough to make a crust, remove from the freezer and allow to thaw for 15 minutes. On a floured surface roll the dough, starting at the center and working your way out. (Sprinkle some flour over top of the dough if it’s a bit too moist.) Roll out the dough until it's about ½ inch larger in diameter than your pie pan.

With a spatula, lift the dough carefully from the surface of the counter into the pie pan. Gently press the dough against the corner of the pan. Go around the pie pan pinching and tucking the dough to make a clean edge

Source: Recipe from The Pioneer Woman Cooks

Saturday, November 19, 2011

Soft Frosted Sugar Cookies

IMG_0022

Its officially Hunting Weekend! Or, as I like to call it, When The Boys Are Away, The Girls Will Play weekend! Nearly all of the men I know have gone off hunting for the weekend, including my own man. I don't know what it is about deer season that gets men all riled up but they're excited and they leave us alone for at least three days (if not more) after nonstop marathon sessions of Modern Warfare *sigh*. But thats a different story!

IMG_0020

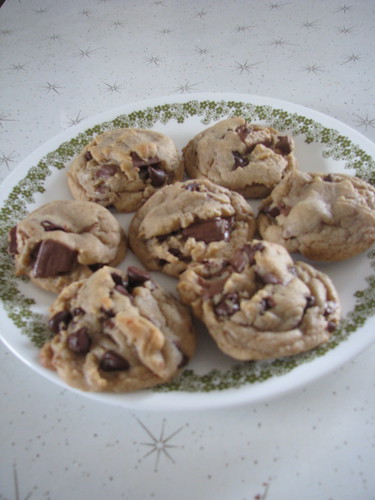
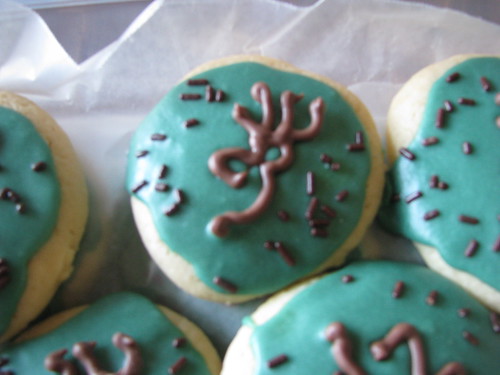
I made these cookies for my boyfriend to take up north to his cabin where him and about six other men are hunting for the weekend. I figured they would need some sugar to keep them going! These cookies were absolutely amazing! So buttery and sugary and just light and perfect! They really tasted like those soft frosted cookies from the store but even better because they're homemade! I did have a little problem with the frosting, it was really thin at first. I got it to thicken more by adding a lot more powdered sugar but it still didn't look as perfect as those grocery store cookies. However it tasted yummy so thats all that really matters, right?

IMG_0023

I made the Browning logo (a deer's head) from chocolate candy melts just by tracing the logo from a printout I found online onto some wax paper. My boyfriend absolutely adored them and I hope the men liked them as well! Now I have to get back to the kitchen because its "Doe's Night". Every year when the hunting men-folk go off on their merry way, us girlfriends and wives left behind have a girls night in full of food, booze, and lots of good fun! I can't wait!

Soft Frosted Sugar Cookies
Ingredients:
For the cookies:
4 1/2 cups all-purpose flour
4 1/2 tsp. baking powder
3/4 tsp. salt
1 1/2 cups (3 sticks) butter, at room temperature
1 1/2 cups sugar
3 large eggs
5 tsp. vanilla extract

For the frosting:
5 cups confectioners’ sugar, sifted
1/3 cup (5 1/3 tbsp.) unsalted butter, melted
1 tbsp. vanilla extract
7-8 tbsp. milk (plus more, as needed)
Food coloring, sprinkles, or candy melts (optional)

Directions:
To make the cookies, preheat the oven to 350˚ F. Line baking sheets with parchment paper or silicone baking mats. In a medium bowl combine the flour, baking powder and salt, and whisk together to blend. In the bowl of an electric mixer, combine the butter and sugar and beat together on medium-high speed until soft and fluffy, about 2-3 minutes. Beat in the eggs one at a time, mixing well after each addition and scraping down the bowl as needed. Blend in the vanilla. With the mixer on low speed, add in the dry ingredients mixing just until incorporated and evenly mixed. Cover and chill the dough for 1 hour.

When you are ready to bake the cookies, scoop a scant quarter cup of dough and roll into a ball. Flatten the ball slightly and place on the prepared baking sheet. Repeat with the remaining dough, spacing the cookies at least 2-3 inches apart. Bake about 10-12 minutes or just until set. Let cool on the baking sheet for several minutes. Transfer to a wire rack to cool completely.

To frost the cookies, place the confectioners’ sugar in a medium bowl. Add the melted butter, vanilla, and milk to the bowl and whisk until smooth. Whisk in additional milk as necessary, 1 teaspoon at a time, until you reach your desired consistency. Tint with food coloring if desired. Use an offset spatula or spoon to frost the cooled cookies. Top with sprinkles or decorate as desired. Store in airtight container. Makes about 2 dozen large cookies.

Source: Recipe from Annie's Eats

Friday, November 11, 2011

Chocolate Kahlua Cupcakes

IMG_0010

Are you ready for one boozy dessert? Kahlua is probably one of my favorite liqueurs. I love a good White Russian, yummy! So when my mom told me that her work wanted to hire me to make cupcakes for their bosses' birthday and that he was a big Kahlua fan, I knew I had to make these immediately! They are so yummy and moist and that coffee Kahlua flavor definitely stands out. I loved it, it actually really reminded me of a White Russian.

IMG_0012

And I was informed that my mom's boss absolutely loved them! I'm so glad that they were such a hit. Apparently a lot of people thought it was awesome that they could have "alcohol" at work. I'm glad I could make their day!

Chocolate Kahlua Cupcakes
Ingredients:
For the cupcakes:
3/4 cup unsweetened cocoa powder
1 tbsp. instant espresso powder
1½ cups all-purpose flour
1½ cups sugar
1½ tsp. baking soda
3/4 tsp. baking powder
3/4 tsp. salt
2 large eggs
3/4 cup warm water
3/4 cup buttermilk
3 tbsp. vegetable oil
1 tsp. vanilla extract

For brushing the cupcakes:
Kahlua liqueur

For the frosting:
12 tbsp. unsalted butter, at room temperature
4 cups confectioners’ sugar, sifted
7-8 tbsp. Kahlua liqueur
2 tbsp. heavy cream

Directions:
To make the cupcakes, preheat the oven to 350 degrees F. Line standard cupcake pans with paper liners. In a large mixing bowl combine the cocoa powder, espresso powder, flour, sugar, baking soda, baking powder and salt and whisk well to blend. Add the eggs, warm water, buttermilk, vegetable oil and vanilla extract to the bowl with the dry ingredients and mix on medium-high speed until smooth, 2-3 minutes, scraping down the sides of the bowl as needed.

Divide the batter evenly between the prepared cupcake liners, filling about 2/3 full. Bake until the tops spring back when pressed lightly, about 18-20 minutes, rotating the pans halfway through baking. Let cool in the pan 5-10 minutes, then transfer to a wire rack. Poke a few holes in the top of each cupcake with the tines of a fork and brush with Kahlua while still warm. Allow to cool completely.

To make the frosting, beat the butter in the bowl of an electric mixer until smooth and fluffy, about 2 minutes. Mix in the confectioners’ sugar until incorporated. Add in the Kahlua and beat on medium speed until well blended. Add in the heavy cream and beat on medium-high speed for about 4 minutes, until light and fluffy. Frost cooled cupcakes as desired. Makes about 2 dozen cupcakes.

Source: Recipe from Annie's Eats

Monday, November 7, 2011

Kit-Kat and Chocolate Chip Peanut Butter Cookies

IMG_0051

Quite the title, right? But these little cookies are so incredibly yummy! Its a great peanut butter cookie, soft in the middle with that crispy outside, mixed with chocolate chips and then Kit-Kats! The Kit-Kats really make an excellent addition. They give the cookie that extra little crunch and I love the way these taste! My boyfriend and mom especially love them. They're always devoured almost as soon as they're made. I normally have to make a double batch just to divide them fairly. That should tell you just how yummy they are!

Kit-Kat and Chocolate Chip Peanut Butter Cookies
Ingredients:
1/2 cup butter, softened
1 cup creamy peanut butter
1/2 cup brown sugar
1 cup sugar
2 eggs
1 tsp. vanilla
2 cups all-purpose flour
1 tsp. baking soda
1 tsp. salt
1 cup crushed Kit-Kats
1 cup semi-sweet chocolate chips

Directions:
Heat oven to 350 degrees F. In a large bowl, beat butter, peanut butter, and sugars until creamy. Add eggs and vanilla, and beat until blended.

In a separate bowl, combine flour, baking soda, and salt. Add the dry ingredients into the wet ingredients, stirring until mixed. Stir in Kit-Kats and chocolate chips.

Drop cookie dough by rounded tablespoonfuls onto an ungreased cookie sheet, 2 inches apart. Bake about 12 minutes, until light golden brown.

Source: Recipe from Little Bitty Bakes

Thursday, November 3, 2011

Yellow Butter Cake with Chocolate Frosting

IMG_0011

Making and decorating cakes are definitely something I need a lot of practice with. Last year I took a cake decorating class through Wilton at a local bakery. And while it really seemed to help, I still have a long way to go. But as they say, practice makes perfect! And if that means making a ton of cakes to perfect these decorating skills, then so be it ;)

IMG_0010

So one of my co-workers has a birthday coming up this weekend and we decided to celebrate it this week. My boss asked if I would be willing to make a cake. She knows she can always come to me for baking needs! The birthday girl is a dessert-fan in general so I knew I could make anything and she would be happy! I finally landed on this yellow butter cake with delicious chocolate frosting! This is such a classic combo and an easy thing when you're just starting out on cakes as well. My decorating skills still need a lot of work, I didn't want to ruin the cake with my botched flowers so I kept it pretty plain and simple. But the taste was there and she loved it, so thats all that really matters!

Oh, and a side note. I got this recipe from Annie's Eats however I didn't feel too comfortable making the original frosting posted. I don't know what intimated me about it but I just didn't feel comfortable making it. I had this feeling it just wouldn't turn out and I was also tired when making this after a long day of work. So I opted for another chocolate frosting from Annie on a different cake that I also want to desperately try soon!

Yellow Butter Cake
Ingredients:
2 sticks unsalted butter, at room temperature, plus more for greasing pans
1 1/2 cups all-purpose flour, plus more for dusting pans
1 1/2 cups cake flour
1 tbsp. baking powder
1/2 tsp. salt
1 3/4 cups sugar
4 large eggs
2 tsp. vanilla extract
1 1/4 cups milk

Directions:
To make the cakes, preheat the oven to 350 degrees F. Line the bottoms of two 9-inch round cake pans with parchment paper. Butter and flour the edges of the pans, tapping out the excess; set aside. In a medium bowl, combine the all-purpose flour, cake flour, baking powder, and salt; whisk together to blend well and set aside.

In the bowl of an electric mixer, combine the butter and sugar. Beat on medium-high speed until light and fluffy, about 4 minutes, scraping down the bowl as needed. Mix in the eggs one at a time, beating well after each addition. Blend in the vanilla. With the mixer on low speed, add in the dry ingredients in three additions, alternating with the milk. Beat each addition just until incorporated.

Divide the batter between the prepared baking pans. Bake, rotating the pans halfway through baking, until the cakes are golden and a toothpick inserted in the center comes out clean, 30-35 minutes. Transfer the pans to a wire rack and let cool 20 minutes. Run a knife around the edge of the pans to help remove the cakes. Invert the cakes onto the rack and peel off the parchment. Let the cakes cool completely before frosting. Level the cakes if necessary.

Source: Recipe from Annie's Eats , originally from Martha Stewart's Baking Handbook

Chocolate Frosting
Ingredients:
1/2 cup unsalted butter
2/3 cup cocoa powder
3 cups confectioners’ sugar
1/3 cup milk
1 tsp. vanilla extract

To make the frosting, melt the butter in a medium bowl. Stir in the cocoa. Alternately add confectioners’ sugar and milk, beating to spreading consistency. Add small amount additional milk, if needed. Stir in vanilla.

Source: Recipe from Annie's Eats